This content was produced for New Zealand by the foundry @ Meredith Corp. Food & Wine editorial staff was not involved in its creation or production.

Bildagentur Zoonar GmbH


Throughout history, there are those individuals who discover delicious ingredients and think: This is good, but what would make it even better? It’s a curious cook who bites into a traditional beef pie and considers experimenting with a Thai curry filling next time. Or, a dairy innovator looking for all the groundbreaking ways to use milk.
Like cream, they rise to the top. That’s the story of the New Zealand dairy industry.
 PHOTOS : New Zealand Trade and Enterprise
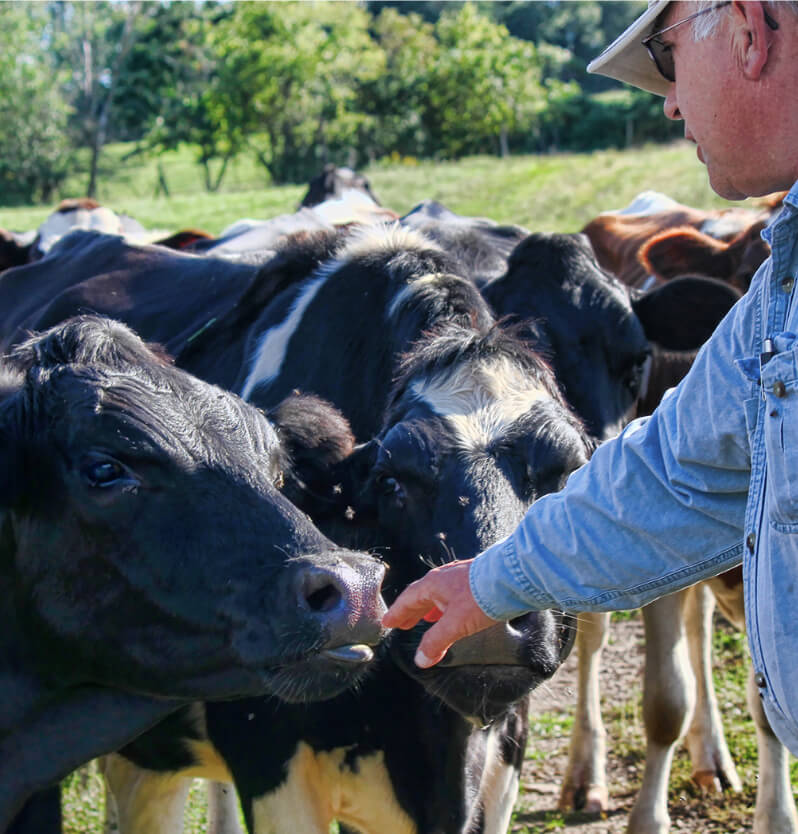 PHOTO : fonterra
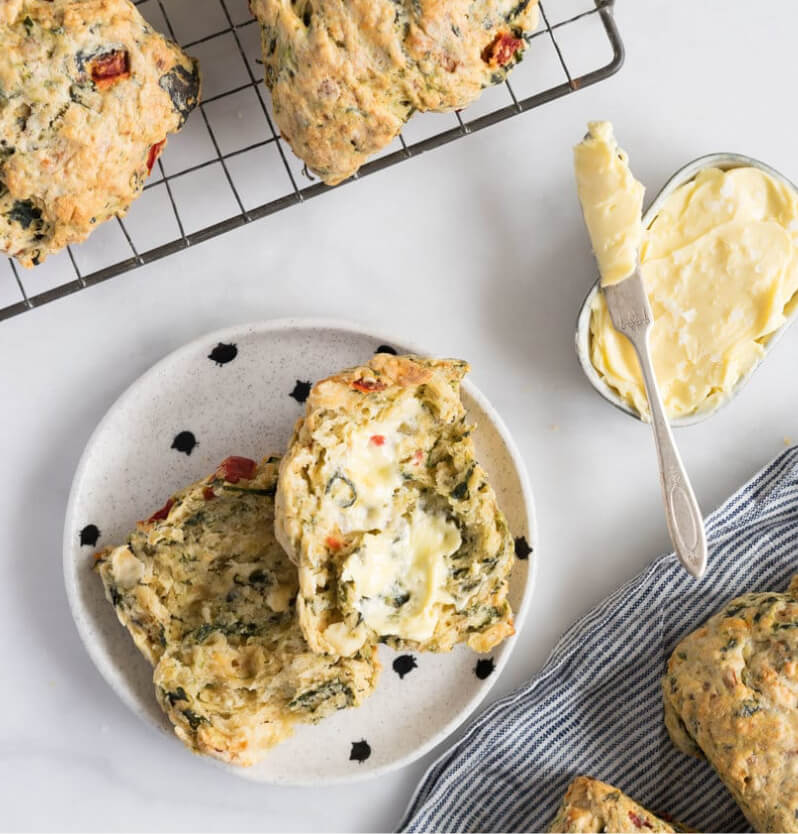 PHOTO : cloudy kitchen
The history of world-leading dairy
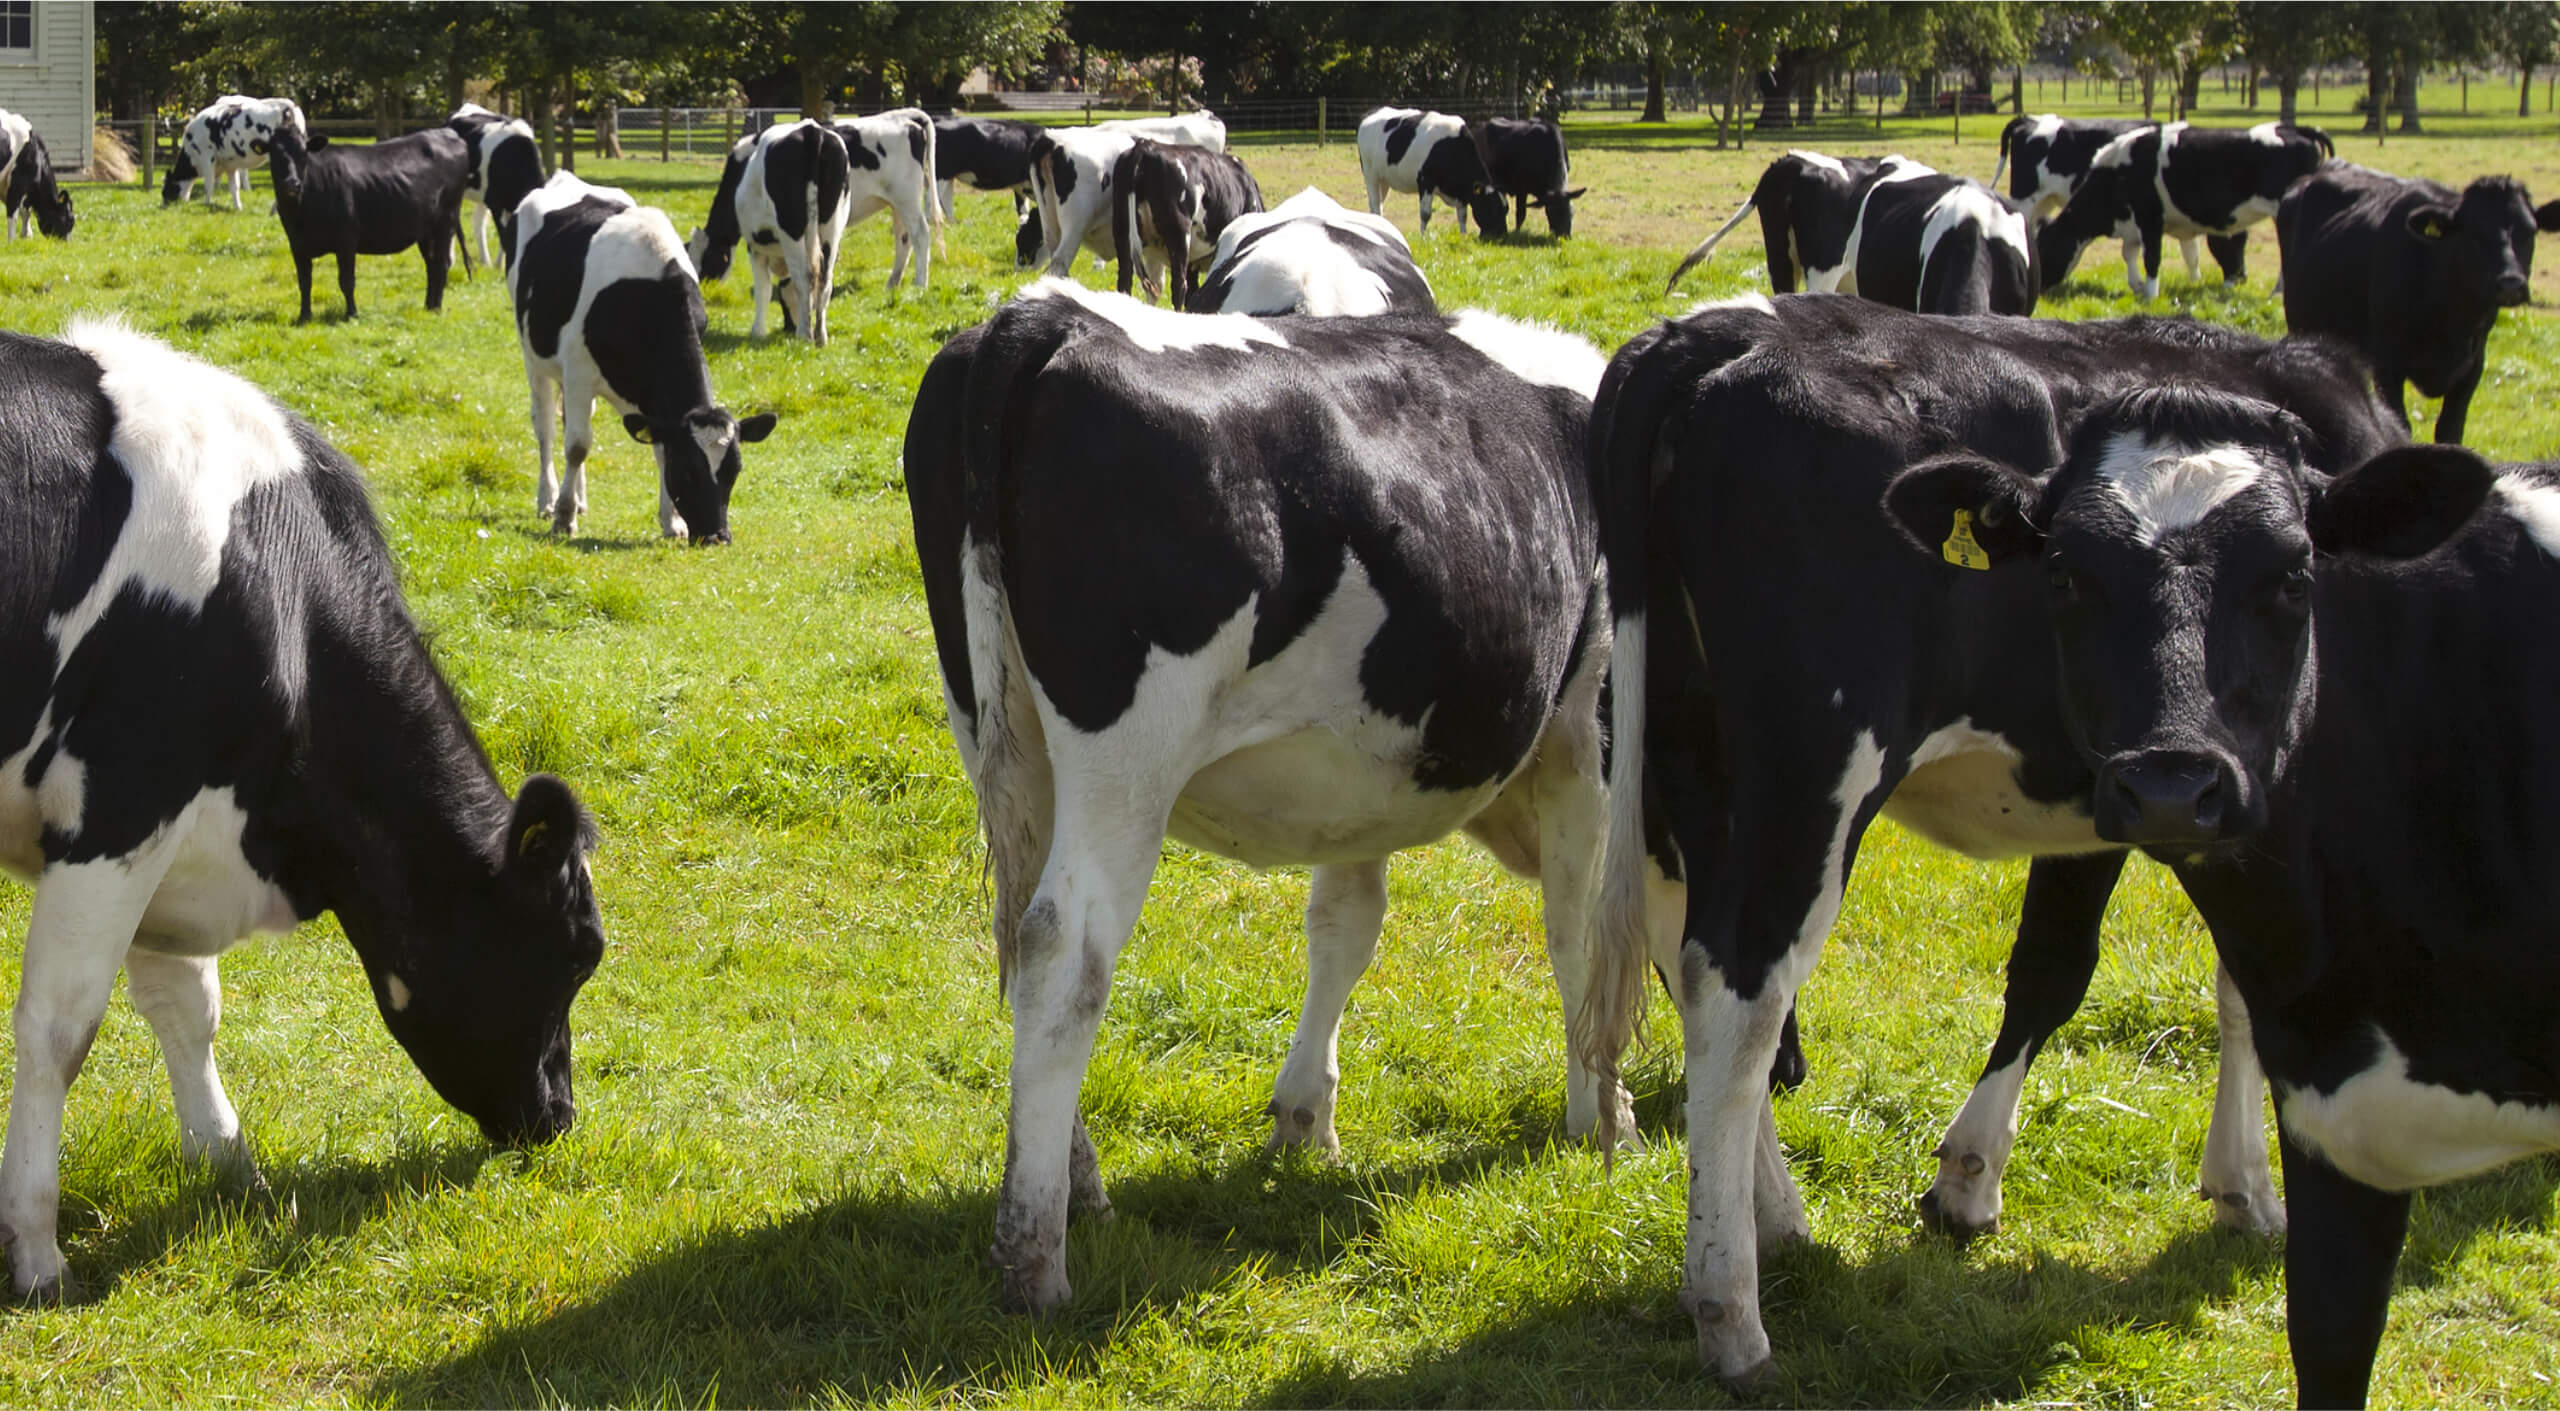
Dairy production started quite simply in New Zealand when British missionary Samuel Marsden brought over the first cows in 1814. Within two centuries, it grew into a dynamic dairy-producing nation starting with its first export of cheese across the Tasman Sea in 1845 (in fact, New Zealand dairy co-ops just celebrated their 150th birthday, as the first one was established in Central Otago in 1871). Some 25 percent of the world’s dairy exports come from Fonterra, a dairy co-op formed in 2001 through a merger of legacy dairy cooperatives by around 13,000 New Zealand farmers.
The difference in dairy begins from the grass up in New Zealand. The pristine landscape is one of the few places in the world where cows can graze on green pastures year-round, meaning almost all of New Zealand’s dairy products come from grass-fed cows. This special care results in milk that is creamy and full of flavor, as well as nutritious. In line with the deeply rooted Māori philosophies of kaitiakitanga and manaakitanga, or caring for and respecting the environment, the local dairy industry has carefully guarded its precious resources.
Complementing a reverence for tradition and craftsmanship is modern ingenuity. The dairy community or hapori has also supported a rich history of research and development, including sustainability efforts and reducing their carbon footprint to one-third of many other nations.
To make the best dairy products, these farmers have explored new ways of doing things, from being the first to breed cows which produce low-fat milk rich in omega-3 fatty acids to improving infant formula.
How to bake with New Zealand dairy
This sweet spot where science and culinary arts meet is perhaps most evident in baking. After all, the secret to making pillowy croissants and flaky crusts is understanding the ways simple ingredients interact.
One person who understands baking from both sides—as a scientist and a baker—is Erin Clarkson. Originally from Nelson, located at the top of New Zealand’s South Island, Clarkson has a degree in geology and worked on an oil rig before moving to Brooklyn and launching a baking blog from her apartment.
As a kid, she grew up in a tight-knit family surrounded by food, where she developed a love for baking. “Most baking in New Zealand is done by scratch, and I grew up baking at home with my grandma, so the 'from scratch' mentality definitely influenced the way that I bake a lot.” Her science background also inspires her to figure out how and why ingredients work.
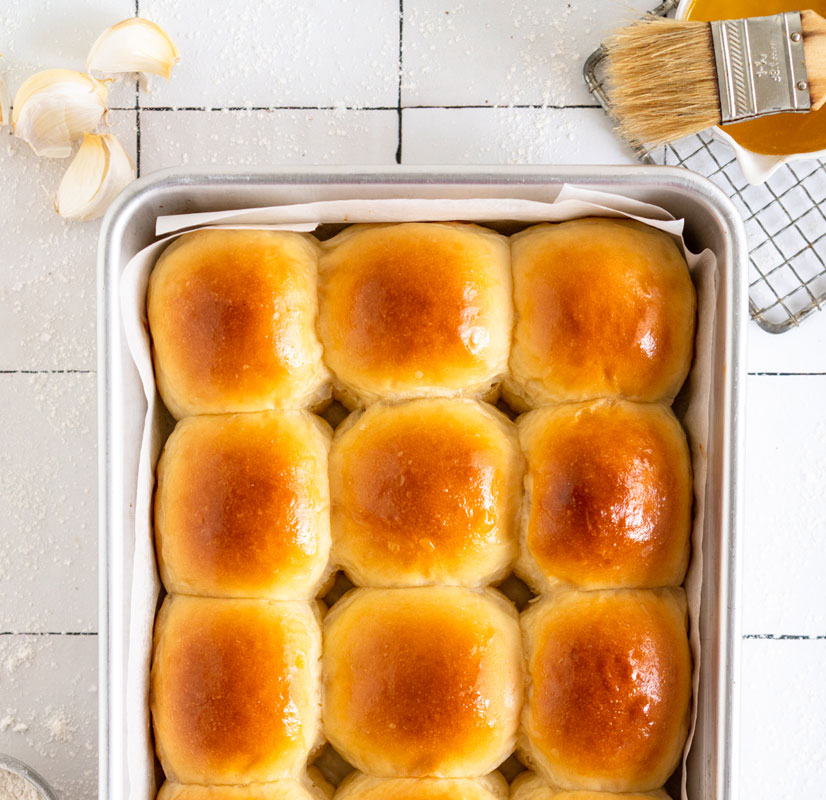
Through her website Cloudy Kitchen, Clarkson often complements beautiful images of baked goods with clever explanations of how ingredients add to a recipe. Breaking down garlic butter dinner rolls for instance, she explains that “butter provides softness and richness in the dough.”
One common thread you’ll find—whether the recipe is sweet, savory, or a mix of both—is her preference for New Zealand butter and cheeses. “There is a richness and depth of flavor in New Zealand dairy that is unparalleled,” she says. “Using great butter makes such a huge difference in baking.”
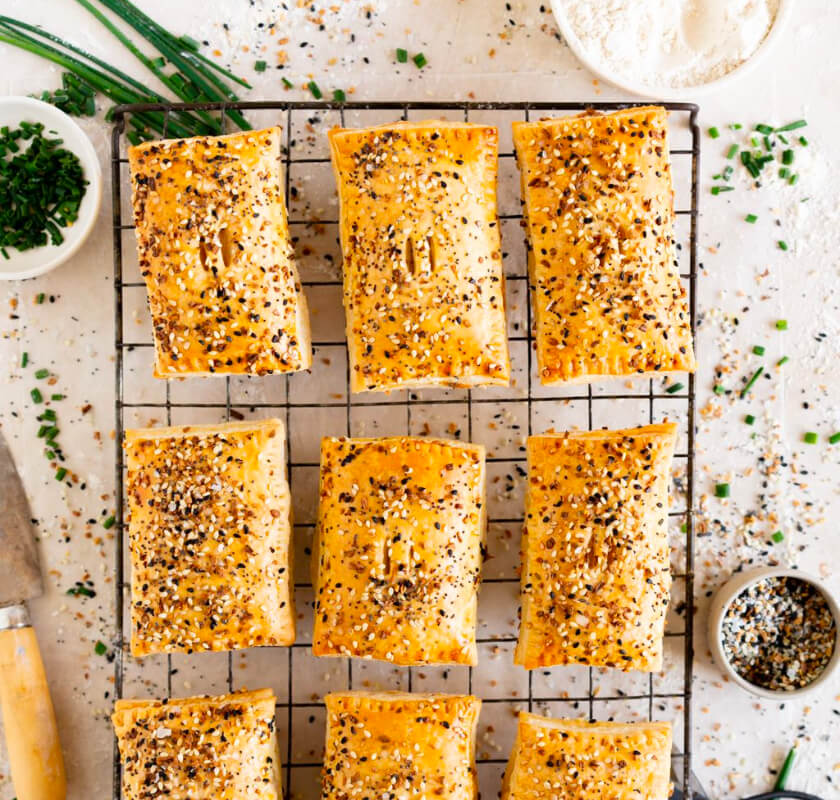
In her recipes, Clarkson has a penchant for giving Kiwi classics a New York spin and vice versa. Case in point: her smoked salmon and cream cheese hand pies with everything seasoning is an ode to bagels and lox encased in a flaky dough typical of Kiwi pies and rolls. (It also nods to New Zealand’s renowned smoked salmon and trout.)
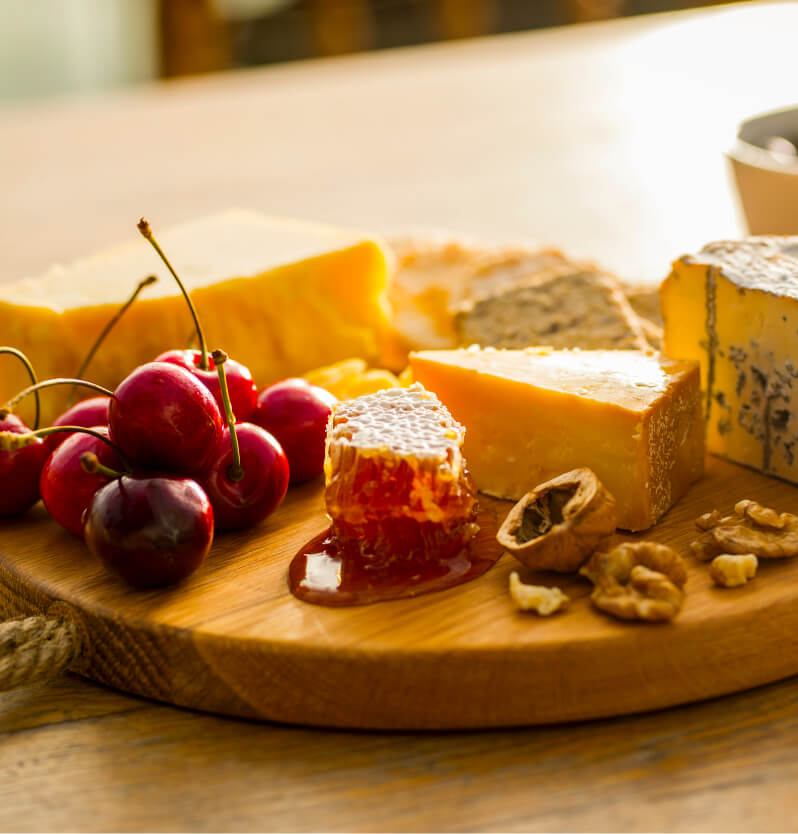
Good cheese starts with great milk. We always had a big block of cheese in the fridge like my fave, tasty cheddar
While piemaking in both the U.S. and New Zealand originated from the U.K., in New Zealand, pies are typically savory—although you will find sweet ones as well. They have a golden, buttery crust with a plethora of fillings ranging from traditional beef and chicken to globally inspired curries. Much like the all-American apple pie, a New Zealand meat pie is the ultimate comfort food for a quick and satisfying meal you can find pretty much anywhere.
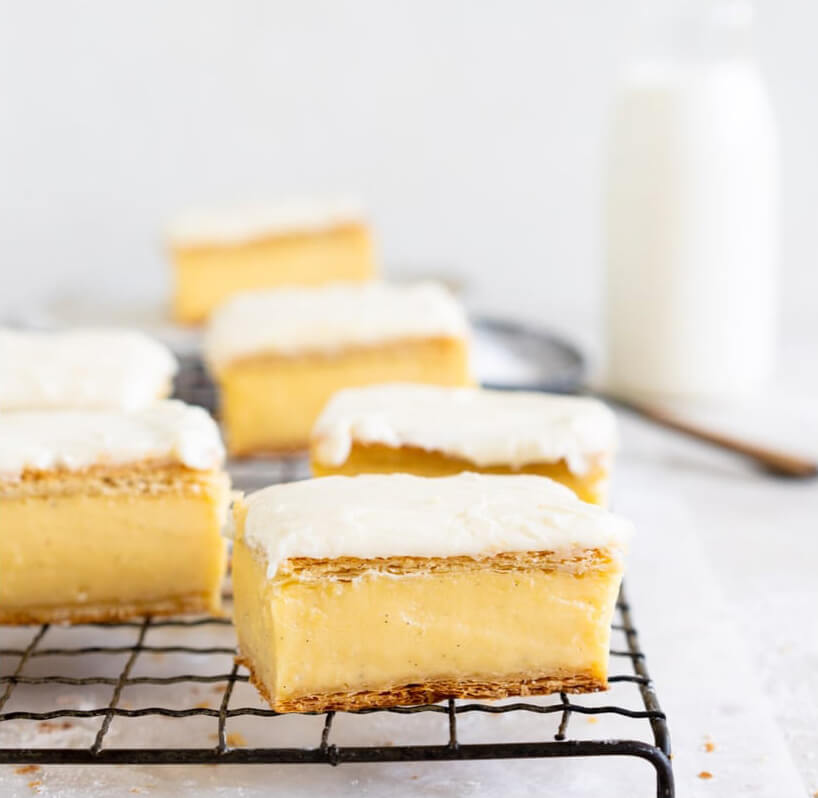
Another Kiwi treat Clarkson insists that every American baker try is the slice; in this case, vanilla custard slice with homemade puff pastry. Slices, which are a staple of the New Zealand baking landscape, are perfect showcases for butter, cream, and milk. “In New Zealand, the cows eat grass and live outside, and in turn make the most amazing milk. We have friends who have dairy farms and my husband's family are sheep and beef farmers. Most places in New Zealand are within close proximity to rural areas and you drive past farms all the time.”
To get an excuse to eat even more New Zealand butter, Clarkson recommends making vanilla buttermilk cake with Swiss meringue buttercream. This rich, creamy masterpiece gets a lovely tang from a homemade cherry compote and has plenty of butter in both the cake and the frosting.
“I am lucky enough to be working with the U.S. branch of Lewis Road Creamery this year, so I get special butter deliveries,” she says. “There is currently about 15 pounds of Lewis Road in my fridge—no joke, it takes up a whole shelf. It is just so, so good!”
The brand launched in the U.S. in 2019 and has quickly gained a loyal following with its eight ounce blocks of unsalted butter, sea salt crystal butter, and garlic and chive butter (which is a great shortcut for making insta-garlic bread any night of the week).
Like the happily grazing cows referred to on the Lewis Road Creamery label, baking with traditionally churned New Zealand butter and cheeses creates melt-in-your-mouth treats, from your cherished family recipes to globally inspired meals.

Vanilla Buttermilk Cake
with Swiss Meringue
Buttercream
See Recipe

Vanilla Buttermilk Cake with Swiss Meringue Buttercream
Recipe courtesy of Cloudy Kitchen
Makes one 6" layer cake; serves 8
Ingredients
For the vanilla bean buttermilk cake:
- 2 large eggs, at room temperature
- 1 teaspoon vanilla bean paste
- 130g buttermilk, at room temperature
- 40g full-fat Greek yogurt
- 200g all-purpose flour
- 150g sugar
- 1 1/4 teaspoon baking powder
- 1/2 teaspoon salt
- 115g unsalted butter, at room temperature
For the cherry compote:
- 450g pitted cherries, diced
- 75g sugar
- 1/4 teaspoon salt
- 1 tablespoon lemon juice
- 1/2 teaspoon vanilla bean paste (optional)
For the vanilla bean Swiss meringue buttercream:
- 125g egg whites
- 200g sugar
- 1/4 teaspoon salt
- 1 teaspoon vanilla bean paste
- 450g unsalted butter, cool, cut into cubes
FOR THE VANILLA BEAN BUTTERMILK CAKE:
- Preheat the oven to 350°F. Grease two 6” cake pans, and line with parchment paper on the bottom (see notes for using bake even strips).
- In a medium bowl, whisk together the eggs, vanilla, buttermilk, and yogurt.
- In the bowl of a stand mixer fitted with the paddle attachment, combine the flour, sugar, baking powder, and salt. Mix briefly to combine.
- With the mixer on low, add the butter a cube at a time, until fully incorporated and the mixture looks like sand.
- Add half of the wet ingredients into the mixer. Mix until just combined, then add the second half of the wet ingredients. Mix on medium speed until just combined. Remove the bowl from the mixer and give a few folds with a rubber spatula to ensure that no dry ingredients remain.
- Divide the batter between your two cake tins. Bake for 25 to 30 minutes, or until the cakes are springy to the touch, and a skewer inserted into the middle comes out clean.
- Remove from the oven and cool for 15 minutes in their pans, then turn onto a wire rack and allow to cool completely.
FOR THE CHERRY COMPOTE:
- Place the cherries, sugar, and salt into a medium saucepan and mix to combine. Place over a medium heat and bring to a boil, then cook, stirring often, for 10 to 15 minutes, or until the fruit has softened a little and the liquid is turning syrupy.
- Remove from the heat and stir in the vanilla and lemon juice, then transfer to an airtight container and allow to cool completely.
FOR THE SWISS MERINGUE BUTTERCREAM:
- Place the egg whites, sugar and salt in the bowl of a stand mixer or a heat proof bowl. Place over a pot of simmering water, ensuring that the water does not touch the bowl.
- Heat, whisking constantly, until the mixture registers 160˚F on a thermometer and the sugar has dissolved. Carefully transfer the bowl to the mixer, and fit with the whisk attachment.
- Whip the egg whites on high until they are snowy white and fluffy, 6-7 minutes. Add the butter one chunk at a time. The mixture may look curdled—but just keep mixing! Once all the butter is incorporated, mix on high for a further 10 minutes.
- Add the vanilla and mix until incorporated.
- Once the buttercream has finished mixing, switch to the paddle attachment and mix on low for one minute to remove any air.
FOR ASSEMBLY:
- Transfer some of the buttercream to a piping bag fitted with a medium round tip or just with the end snipped off—this will be used to make a buttercream dam to hold in the cherry filling between layers.
- Secure one of the layers of cake to a cake turntable using a little buttercream. Add about half a cup of buttercream onto the first layer of cake, and smooth using an offset spatula.
- Create a buttercream dam using the buttercream in the piping bag by piping a ring of frosting around the outside edge of the first layer. Fill in the ring with the cherry filling (leave any extra juicy stuff behind; you may not need all of it).
- Place the second layer of cake onto the first, upside down to give you a flat top edge, pressing very lightly to secure, and sealing the joins with a layer of buttercream.
- Crumb coat the cake—to do this, apply a thin layer of buttercream over the surface of the cake, and smooth with a bench scraper or icing smoother. You can chill the cake now if you like, or you can continue on frosting it.
- Apply a layer of buttercream over the surface of the cake and smooth off briefly with an offset spatula and scraper. Using your offset spatula, create swoops in the frosting. Smooth off the top edge. Alternatively, finish as desired.
- Store in the fridge until serving. Allow to stand at room temperature for 20-30 minutes before serving. Store leftovers in the fridge.
Recipe by Erin Clarkson, Cloudy Kitchen
Custard Slice with
Homemade Puff Pastry
See Recipe
Custard Slice with Homemade Puff Pastry
Recipe courtesy of Cloudy Kitchen
Makes 12 large or 16 smaller slices
Ingredients
For the puff pastry butter block:
- 450g unsalted butter, at room temperature
- 70g bread flour
For the puff pastry dough:
- 400g bread flour
- 100g all-purpose flour
- 1 1/2 teaspoon fine sea salt
- 115g unsalted butter, at room temperature
- 1 tbsp vanilla bean paste (optional)
- 290g cool water
For the vanilla bean custard:
- 720g whole milk
- 480g heavy cream
- 2 teaspoon vanilla bean paste
- Pinch of Salt
- 65g custard powder
- 200g sugar
- 3 eggs, at room temperature
- 70g unsalted butter, at room temperature
For the vanilla bean icing:
- 375g powdered sugar, sifted
- 45g unsalted butter, at room temperature
- 1/2 teaspoon vanilla bean paste
- Whole milk to mix (a few tablespoons)
FOR THE PUFF PASTRY:
- Cut a piece of parchment paper so it measures approximately 13 x 18 inches. Position with the short side facing you.
- In a medium bowl, place the butter and flour. Mix vigorously using a silicone spatula. Spread onto the bottom third of the parchment paper, and use an offset spatula to spread into a rectangle 6"x9", and 1/2" thick. Carefully square off the edges. Wrap in the parchment paper, and place in the fridge to firm up.
- In the bowl of a stand mixer fitted with the dough hook, combine the bread flour, all-purpose flour, and salt. Add the butter and vanilla, and mix on low until the butter is fully incorporated into the mixture. Add the water, and mix until a dough forms, 5-6 minutes. Increase the speed, and mix on high for 2-3 minutes until smooth.
- Turn out onto a piece of plastic wrap, and pat into a rectangle with your hands. Wrap in the plastic and rest in the refrigerator for 40-50 minutes.
- Once the butter and the dough are a similar temperature (60-70˚F), remove both from the fridge. On a lightly floured surface, roll the dough out to a rectangle 12" x 10", taking time to carefully measure, and squaring off the edges using a bench scraper if necessary. (This will make doing the folding much, much easier). Orient the rectangle so that the short side is facing you.
- Using the paper as a guide, peel back half of the parchment on the butter, and place on the bottom half of the dough, leaving a 1/2" margin around the edges. Fold the top half of the dough down over the butter block, pressing firmly around the edges to seal, and tuck any excess dough underneath the block. Wrap the dough tightly in plastic, place on a baking sheet lined with parchment, and rest in the refrigerator for approximately 30 minutes.
- Turn #1: 4-fold
- Remove the dough from the fridge, and unwrap. On a lightly floured surface, roll out to a 1/2 inch thick rectangle that is 13" wide and 19" long. If it is too warm and is becoming sticky, return to the fridge for a little more rest time. If it is too hard, allow to sit at room temp to soften a little. 30 minutes works well for each rest time. Square off the edges. Turn the dough so a long edge is facing you. Take the left edge of the dough, and fold 3/4 of the way across the dough, lining up the edges. Fold the right edge to meet the left, about 1/4 of the way across. Fold the dough in half, left side over right. Transfer to the baking sheet, brush off extra flour, and cover with plastic wrap. Rest for another 30 minutes.
- Turn #2: 3-fold
- Remove the dough from the fridge. On a lightly floured surface, repeat the rolling process—roll to 13" x 19", and square the edges. Turn so a long edge is facing you. Fold the left side of the dough 1/3 of the way across, then fold the right side of the dough over the left (so you have 3 layers of dough). Place on the baking sheet, brush off flour, cover and refrigerate. Rest for 30 minutes.
- Turn #3: 4-fold
- Repeat the process for a 4-fold as explained above, taking care to square the edges. Cover and rest for 30 minutes.
- Turn #4: 3-fold
- Repeat the process for the first 3-fold. This is your final fold. Roll out, square off, and repeat the instructions for a 3-fold above. Cover, and rest for at least 30 minutes or up to overnight.
- At this stage the dough is ready to be used—cut in half, and store the dough either wrapped tightly in the fridge (you will use one half for the custard slice and you can keep the rest for another project), or in the freezer.
- To make the pastry sheets, preheat the oven to 350˚F. Line two baking sheets with parchment paper. Take 700g of the prepared pastry (one half of the recipe above), and divide the piece into two. Wrap half in plastic and place in the fridge until needed—you will do this in two batches.
- On a lightly floured surface, roll out the first piece of pastry into a square that measures 11" square—this allows for shrinkage. Place onto the prepared baking sheet, and top with a second piece of parchment paper, then place a second baking sheet on top, to help prevent rising.
- Prepare the second piece of pastry the same way. Alternatively if you do not have enough baking sheets you can bake these one at a time and just repeat the process twice.
- Place the baking sheets in the oven, and place something heavy such as a cast iron skillet on top of the second baking sheet. Bake the pastry for approximately 40 minutes, switching half way through, or until golden brown. Remove the top baking sheet, and parchment paper, and bake uncovered for a further 5 minutes. Allow to cool slightly on the baking sheet, before transferring to a wire rack to cool completely.
- Using a sharp knife and the tin you are planning on using as a guide, trim the pastry squares so that they are the same size as your tin. Set aside until ready to assemble.
FOR THE VANILLA BEAN CUSTARD:
- In a large heavy bottomed saucepan, place the milk, cream, vanilla paste and salt. Heat over medium heat, until it is very hot to the touch and just shy of a simmer.
- Meanwhile, while the milk is heating, place the custard powder and sugar in a medium bowl, and whisk to combine. Add the eggs, and whisk until well combined and slightly pale in colour.
- Once the milk mixture has heated, remove it from the heat, and, whisking constantly, pour half of it into the egg mixture. Whisk well to combine, before adding the rest of the milk and whisking very well. Wash and dry the saucepan, and return to the stove. Strain the mixture back into the saucepan, and place over low to medium heat. Cook for 10-15 minutes, whisking constantly, until the custard is very thick. Remove from the heat and add the butter a small piece at a time, whisking to incorporate before adding the next piece.
- Use immediately for assembly.
FOR ASSEMBLY:
- Line a 9" square tin with two sheets of baking paper, extending over the sides of the tin to act as a sling. Place the first piece of puff pastry in the bottom of the tin, trimming slightly to make it fit if needed.
- Pour the hot custard over the top of the puff pastry, and smooth with an offset spatula. Place the second piece of pastry on top, pressing down lightly to ensure there are no air bubbles. Cover the tin with plastic wrap, and place in the fridge to set for at least 3-4 hours, or up to overnight.
- Once the custard has set, carefully use the parchment paper to remove the custard slice from the tin, and place on a chopping board or large plate.
- Combine the powdered sugar, unsalted butter, and vanilla bean paste in a medium bowl. Add enough milk to reach a spreadable consistency (about 3 tablespoons), or the desired consistency. Add more if you like a more glaze-like icing and less if you would like to make swoops in your icing.
- Spread the icing over the surface of the custard slices, then place briefly in the fridge to allow the icing to set.
- Once the icing has set, cut into 16 squares using a bread knife which has been run under cold water and then wiped. Use a careful sawing motion. Serve immediately, or refrigerate until ready to serve. Best served slightly cold, on the day or the day after they are made.
- Store leftovers in an airtight container in the fridge.
Recipe by Erin Clarkson, Cloudy Kitchen
Smoked Salmon and
Cream Cheese Hand
Pies with Everything
Seasoning
See Recipe
Smoked Salmon and Cream Cheese Hand Pies with Everything Seasoning
Recipe courtesy of Cloudy Kitchen
Makes 10 hand pies
Ingredients
For the flaky pie dough:
- 375g all-purpose flour
- Pinch of salt
- 225g (2 sticks) cold unsalted butter, cut into cubes
- 240g (1 cup) cold water
- 1 cup ice
- 60g (1/4 cup) apple cider vinegar
For the smoked salmon filling:
- One 100g Packet Regal Smoked Salmon
- 225g full-fat cream cheese
- 2 teaspoons lemon juice
- 1 tablespoon chopped chives, plus more to taste
- Salt and pepper to taste
- Egg wash (1 egg whisked with 1 tablespoon water)
- Everything Seasoning
FOR THE FLAKY PIE DOUGH:
Place flour and salt into a large bowl. Cut butter into chunks, and add to the flour. Toss lightly to coat. Working quickly with your fingers, fold the butter into the flour mixture, squishing each cube between your fingers once. There will be big lumps left in the dough but as long as they are flat in shape this is fine—they get all rolled out during the folding process!
Combine ice, water and cider vinegar in a bowl. Sprinkle a few tablespoons of the ice water into the flour and butter mixture, and using a stiff spatula or your hands, mix in well. Continue adding water a tablespoon at a time until you have a dough that holds together well, but is not too wet. Squeeze together with your fingertips to make a homogenous dough.
Shape into a rectangle and wrap tightly in plastic wrap, and rest in the fridge for an hour.
After the dough has rested for an hour, unwrap and place on a lightly floured surface. Roll the dough into a rectangle, adding extra flour as needed (it doesn’t have to be perfect), and then dust off any excess flour and fold the dough in thirds like you were folding a letter. Roll out again into a rectangle, then repeat the folding process.
Re-wrap the dough and rest in the fridge for 30 minutes, then repeat the rolling and folding process two more times (for a total of four folds), then wrap the dough tightly in plastic wrap and leave to chill for at least a few hours, or ideally overnight.
FOR FILLING AND ASSEMBLY:
Place the Regal Smoked Salmon, cream cheese, lemon juice, chives, salt, and pepper in the work bowl of a food processor. Pulse until smooth, scraping down the edges as needed and adjusting for seasoning if necessary. Transfer the filling into a piping bag or a ziplock bag.
On a lightly floured surface, roll out the pie dough into a large rectangle (at least 15”x16”—you want it to be able to fit 20 3”x4” rectangles). If you are worried about it getting too warm and soft, you can cut it in half and do this in two parts, or I like to roll it out and then cut it into two pieces and chill those briefly before cutting the smaller rectangles out.
Using a ruler and a sharp knife or pastry cutter, cut the pastry into 3" x 4" rectangles. You should get 20 rectangles. Place the cut rectangles carefully onto a parchment paper-lined baking sheet, and refrigerate for 10 mins or freeze for 5 mins to help firm up the pastry slightly.
Remove the pastry rectangles from the fridge and match up into pairs. Lightly brush the edges of one piece of pastry with egg wash, then pipe a rectangle of the salmon mixture. Top with a second piece of pastry, pressing down lightly around the edges to seal, ensuring that there are no air bubbles.
Transfer to a parchment paper-lined baking sheet, then use the tines of a fork to press down around the edges to help seal. Repeat with the remaining rectangles of pastry until all the hand pies are assembled.
Place the baking sheet in the freezer and freeze for 30-40 minutes, or until the dough becomes very firm. If you are planning on freezing them for a longer period of time, freeze solid then transfer to an airtight plastic bag.
While the pies are in the freezer, preheat the oven to 375°F. Remove the pies from the freezer. Using a sharp knife, cut two slits in the top of each pie, brush with egg wash, and sprinkle with everything seasoning.
Bake for 25-35 minutes, until the pies are deeply golden brown on the tops and bottoms (lift one up the check the bottom) Remove from the oven and allow to cool. Serve warm or at room temperature. Store leftovers wrapped in foil at room temperature. Reheat in the oven to help keep the pastry crispy.
Recipe by Erin Clarkson, Cloudy Kitchen
Garlic Butter
Dinner Rolls
See Recipe
Garlic Butter Dinner Rolls
Recipe courtesy of Cloudy Kitchen
Makes 12 rolls
Ingredients
For the bread dough:
- 150g whole milk, lukewarm
- 40g water, lukewarm
- 1 tablespoon granulated sugar
- 1 teaspoon active dry yeast
- 1 large egg, at room temperature
- 245g bread flour
- 50g all-purpose flour
- 20g milk powder
- 3/4 teaspoon kosher salt
- 45g unsalted butter, at room temperature
- Egg wash (1 egg beaten with 1 teaspoon cold water)
For the garlic butter:
- 50g unsalted butter, cold from the fridge is fine
- 2 cloves garlic, finely minced or grated on a microplane
- Big pinch of flaky sea salt, such as Maldon
- Flaky sea salt, such as Maldon, to finish
FOR THE BREAD DOUGH:
In the bowl of a stand mixer, combine the milk, water, sugar, and yeast, and leave to stand for 5 minutes until foamy.
Add the egg, bread flour, all-purpose flour, milk powder, salt, and butter, and mix with the dough hook attachment on low speed until combined, 2-3 minutes, scraping down if the hook is having a hard time reaching any dry flour.
Increase the speed of the mixer to medium-high and mix the dough for 15 to 20 minutes, until it is smooth, supple, and is pulling away from the sides. It will go through stages where it looks like it will never come together—this is fine, just leave it to keep mixing and it will develop strength. It may not pull fully away from the sides but you will see that the gluten is developing and the dough generally moves as one mass. It will be very smooth and stretchy and will pass the windowpane test.
Turn the dough out onto a very lightly floured surface, and shape into a tight ball. Transfer to a lightly oiled bowl and cover with plastic wrap. Leave to proof in a warm place until doubled in size, which will take anywhere between 1 1/2 to 2 1/2 hours depending on the temperature of your kitchen.
Turn the dough out onto a lightly floured surface, and divide into 12 pieces of equal weight. The dough should weigh about 600g so you want to shoot for 50g per piece. Weigh your dough first just to check and divide that number by 12 to work out your weight per ball.
Working with one piece of dough at a time, flatten out the piece of dough, then tuck up into a ball, then turn the ball seam side down and roll into a tight ball by cupping your hand to create a 'claw' shape, using the tension from the counter to roll the dough tightly. Place to the side and cover lightly with plastic wrap. Repeat with the remaining pieces of dough, grouping the balls together on your counter with a little space between them so they don't touch.
Grease or line a 9"x13" pan.
Leave the dough balls to rest under the plastic for 10 minutes, then give them a quick re-roll to tighten the ball back up, and arrange in the prepared pan. There will be a little space between your dough balls.
Cover the pan with plastic and leave to rise in a warm spot for about an hour, until the dough balls are puffy and when poked gently, an indentation that slowly springs back is left.
When there is about 20 minutes to go on the second rising period of the rolls, preheat the oven to 375°F.
Brush the rolls with egg wash, and place in the oven. Bake uncovered for 15 to 18 minutes, until the rolls are evenly golden brown and register 190°F internal temperature on a thermometer (checking the internal temperature isn't super important, just bake until nice and golden brown).
When the rolls are done, remove from the oven. If serving immediately, brush with the garlic butter and sprinkle with extra flaky sea salt.
FOR THE GARLIC BUTTER:
lPlace the butter and garlic into a small saucepan and place over medium low heat. Cook until the butter is melted, then cook for a further 1-2 minutes, stirring often, to infuse the butter and take the edge off the garlic.
Add a big pinch of salt, then stir to combine and use.
This can be made ahead and then just re-melted prior to use.